Craft up a stationery storm in the key of Christmas with our 6 DIY tutorials! For kids of all ages (fun for adults too!) we've got something for everyone.

1. Dot paint Christmas Tree Art
Dot painting this Christmas tree art is such a fun little DIY for kids. This one is really forgiving for painting outside the lines and still creating a really striking art piece! Brilliant for flexing fine motor skills and building on colour recognition. It's also quite relaxing! See this one in action, here.
Perfect for ages 3+ with adult assistance a must (involves measuring and cutting)
You'll need:
- Dot Paints
- Mid weight white cardboard A4 or A3
- Cutting knife
- Ruler
Instructions:

1. Fold your cardboard in half horizontally.
2. Draw a tree shape on the inside right page.
3. Get dotting! Use colours (other than green - we'll save that for later) to dot randomly on the tree shape you've drawn. Don't worry about going 'outside the lines' - that's a good thing here!

4. Fill in the gaps with your green Dot Paint marker, and choose a colour for the tree base.
5. Draw a matching tree shape on the opposite side of the card by measuring and matching the distance to center.
6. Carefully cut out the shapes - grown up help recommended here!

7. Stick double sided tape on the inside left page - around the tree shape and on the edges.
8. Fold the front over, stick down, and voila!

2. Recycled cardboard Gingerbread Person bunting
Repurpose your old cereal boxes and craft this cute gingerbread person bunting. A fun one to help unleash your little ones creativity, this is a great activity for children aged 2+ (with adult supervision and assistance) and creates a lovely little personalised keepsake to hang up each year. It’s also great for siblings or groups of kids as each child can create their own custom Gingerbread Person. Keep the template safely popped aside with the bunting throughout the year and make a new gingerbread person each year to see the evolution in your child’s creativity! See this one being created, here.
Perfect for ages 2+ with adult assistance
You'll need:
- Recycled cardboard - old cereal boxes are perfect!
- Scissors
- Glitter Markers
- String
- Sticky tape
- Ruler
Instructions:

1. Create a gingerbread person shaped template to trace around the back of your recycled cardboard box.
2. Trace around the template with a pencil and fit as many as you can! Around 10-12 Gingerbread People is perfect.
3. Carefully cut out the people! Grown-ups assistance recommended here.

4. Time to decorate! We used our super sparkly Glitter Markers for an extra punch of vibrancy against the natural cardboard background. Would also work well with Silk Crayons or Scented Markers! You can really decorate these however you like - add eyes, smiley faces (or whatever expression you fancy!), mix up the colours, complete with buttons and bow-ties!

5. Once decorated, turn the Gingerbread People over once and measure approximately 20cm on your piece of string. Tape the string to the back of the Gingerbread's head and repeat every 20cm, until you have about 2 freshly baked/crafted meters of scrumptious Gingerbread Person bunting!

3. Magic Highlighters Bauble Art
These magical highlighters are perfect for creating delightful ornament drawings. Zig, zag, wiggle and dot your way across coloured-in circles using these dual-tipped markers. Turn the finished art pieces into a Christmas card by simply folding the paper, or draw on heavy card and cut out the baubles, punch a hole near the edge and tie some string for a cute DIY tree ornament! Watch the baubles come to life here!
Perfect for ages 3+
You'll need:
- Magic Highlighters
- Card or paper
Instructions:

1. Draw a circles with the coloured end of the Magic Highlighter. Draw as many as you can fit onto the page!
2. Colour in the circles to create a solid wash of colour.
3. Turn the Magic Highlighter over (it's dual tipped!) and use the 'invisible' end to draw patterns into the baubles. Dots, zig-zags, holly and bells all work a treat!

4. Technicolour Metallic Gift Tags
This is a simple DIY activity that brings together colour exploration, pattern making, construction, shape recognition and drawing all in to one. Or, in short: a fun activity for kids with cute and practical results! This activity allows even the littlest artists to achieve visually striking results. Watch this one come to life here.
Perfect for ages 2+ with adult assistance
You'll need:
- Metallic Silk Crayons
- Plain white matte card
- Scissors
- Eraser
Instructions:

1. Use the super smooth Metallic Silk Markers to fill a (double sided) piece of card with COLOUR! Create patterns, draw pictures, write words, go nuts, most importantly cover the whole page with crayon! We've used a few different patterns but it's really just limited by the imagination - and kids have the best imaginations!

2. Once the whole page is covered in colour, flip it over. Draw stars, circles, or really any shape you like. Just bear in mind you want the area to be big enough to write a gift recipients name on it! Use an eraser to remove any extra markings you've made so that the gift tags will be nice and clean on this side.

3. With an adults help, cut out the shapes. You can punch holes into the shapes after this step too if you want to attach string or ribbon. Flip them over and you'll have super shimmery, sweet little rainbow gift tags ready to brighten up all those pressies! 🎁

5. String Light Wrapping Paper
Super easy yet visually very effective, this easy craft activity doubles as a unique personal touch on gift giving! Good for little ones aged 4+ as it helps reinforce pattern recognition and fine motor skills getting those dots close to or on the lines (depending on your child’s ability - younger can try too you just might end up with the ‘lights’ noticeably distant from their ‘string’!) The best part? Kiddos will be so proud of their work and it adds a sweet personal touch to your Christmas gifts for family and friends this year! See how we created this one here.
Perfect for ages 4+
You'll need:
- Dot Paints
- Butchers paper or large piece of white paper
- Black marker
- A present to wrap!
Instructions:

1. Start by laying out the butchers paper. Make sure the paper you're using is going to be big enough for the gift you want to wrap!
2. Draw long, continuous loopy lines across the paper starting from one end and finishing on another. The lines look great overlapped!

3. Choose a colour and dot spaced out 'lights', following along with the string. Then switch colours, and repeat!
4. Keep going until you've use all the colours you want to and you're happy with the amount of lights!

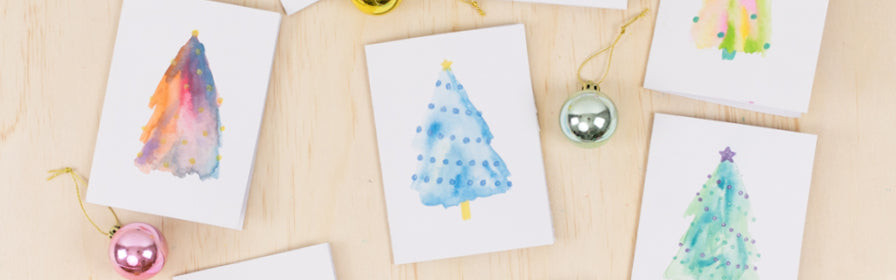
6. Rainbow watercolour Christmas cards
Make your own dreamy, sparkle embellished, rainbow watercolour Christmas tree cards this year! They're practical, creative and cute-to-boot.
Perfect for ages 8+ with adult assistance
You'll need:
- Watercolour paint*
- Watercolour paper*
- Paint brush / waterbrush* (*we used these items all included in our How to Paint - Watercolour activity set)
- Tiger Tribe Glitter Markers
Instructions:

1. Fold your watercolour paper in half
2. We used a wet-on-wet watercolour painting technique: Using a clean paintbrush, paint water in a triangle shape on the front centre of your card. While still wet, choose two to three colours (for best results avoid putting too many colours on the page - even a small amount will blend and bloom magnificently!) to dot and splodge on top of the wet-brushed tree design. This technique is further outlined in our Watercolour activity set.

3. Once completely dry, get to decorating the tree! There really is no substitute for our uber-sparkly Glitter Markers when it comes to completing these cards. Draw baubles, dots, tinsel and stars using the different coloured markers - wherever the artiste's imagination takes them! And voila. Perfectly pretty, DIY cards for popping in the post to spread some Christmas cheer.
Let us know in the comments below if you try one of these out with your kids! We'd love to see what you create.
Leave a comment